Make a 60-second explainer with Opus 5.5: sources, scenes and MP4 checks
Build a source-checked educational video with an Opus 5.5 editing brief, a real 60-second reference MP4, editable code, narration and verification steps.
 Ofox
Ofox 
An Opus 5.5 explainer-video workflow needs two deliverables: an editable project and a rendered video whose explanation you can check. Start with one narrow question, attach the sources, give every factual sentence a scene, then verify the exported MP4 against those claims. A polished transition cannot repair a wrong denominator.
This tutorial uses a concrete task: explain precision and recall with ten fictional support tickets in exactly 60 seconds. You get an English reference video, editable rendering code, narration and a timed subtitle file. The reference was authored for this article and rendered locally; we did not call Opus 5.5 to generate it. The prompts below are briefs for your own Opus editing session, not proof of model performance or guaranteed one-prompt results.
Download the editable project or watch the 60-second reference MP4. The example is intentionally small enough that you can audit every object on screen before applying the method to a more complicated subject.
1. Decide what the viewer must learn
Our viewer is a support-operations colleague who has seen a classification score but does not understand its denominator. After watching, they should be able to explain why precision is 3/5 and recall is 3/4 for the same predictions. They do not need a tour of model architectures, threshold selection or every evaluation metric.
The ground truth is fixed: tickets 1, 2, 3 and 4 are urgent; the other six are normal. The fictional classifier flags tickets 1, 2, 3, 5 and 6. That gives three true positives, two false positives, one false negative and four true negatives. These are authored teaching labels, not customer records or measurements from any model.
The factual source is Google’s classification metrics lesson. Precision divides correct positive predictions by all positive predictions; recall divides found positives by all actual positives. Everything about ticket identities, colors, scene length and wording is our own teaching design. Keep this distinction in the project so an editor does not accidentally turn an illustration into a benchmark.
A useful learning objective describes a checkable action. “Understand AI evaluation” is too broad for a minute. “Identify which five cards belong in the precision denominator” gives the scriptwriter, animator and reviewer the same target. Save advanced questions for a linked follow-up instead of squeezing a second lesson into the closing seconds.
2. Map sources to sentences and scenes
Before asking for animation, make a claim ledger. Our ledger separates external definitions from locally calculated results and editorial choices. Only the definitions need an external citation; the numerical example must be reproducible from the ten labels.
| Time | Teaching job | Claim and evidence | Visual acceptance |
|---|---|---|---|
| 0–10 s | Introduce the question | Ten fictional tickets, four urgent: authored fixture | Ten unique IDs remain visible |
| 10–20 s | Establish ground truth | Urgent IDs are 1–4: fixture | Those four cards are orange |
| 20–30 s | Reveal predictions | Flagged IDs are 1, 2, 3, 5, 6: fixture | Blue outlines surround exactly those five |
| 30–40 s | Explain precision | Definition from Google; 3/5 from fixture | The selected set contains three orange cards |
| 40–50 s | Explain recall | Definition from Google; 3/4 from fixture | All four urgent cards are selected |
| 50–60 s | Contrast the questions | Numerator stays three; denominators differ | Both fractions match the cards |
The invariant is the identity of each ticket. Ticket 4 must not quietly become ticket 5 during a transition. Color encodes ground truth; an outline identifies the set under discussion. Text labels repeat the category so viewers are not required to distinguish color alone.
Do not ask the model to “find some statistics” after storyboarding. That invites an attractive sentence with no traceable origin. Attach the source URL and the relevant definitions first. If an added sentence cannot be mapped to a source or an explicit calculation, remove it or label it as a suggestion awaiting verification.
3. Give Opus a bounded editing task
Start from the downloaded project and use the following brief in an environment that can read files and run the renderer. Select Opus 5.5 using the model controls available to your account; this tutorial does not assume a particular API endpoint or include a paid request. For a broader introduction to project-based video work, see our Opus video prompts and MP4 guide.
Create a revision of this 60-second educational video project.
Audience: support operations staff, no statistics prerequisite.
Learning outcome: explain why precision=3/5 and recall=3/4.

Read render.py and README.md before editing.
Truth: urgent={1,2,3,4}; predicted urgent={1,2,3,5,6}.
Definitions source:
https://developers.google.com/machine-learning/crash-course/classification/accuracy-precision-recall

Preserve all ten item IDs and the six 10-second scene intervals.
Keep orange for actual urgent and text labels for accessibility.
Use the blue outline only for the set explained in the current scene.
Change narration, spacing and transitions only when they improve clarity.
Do not invent research findings, API tests or claims about Opus quality.
Do not install paid services, request API keys or change the dataset.

Deliver the source diff, 60-second MP4, captions, sampled frames and
ffprobe output. Run the fixture checks. Report every command actually
executed, failed checks and any missing tool. Do not call a preview an MP4.
If source interpretation is uncertain, stop that claim and explain why.
Ask for a storyboard and a list of proposed changes before accepting a large code rewrite. Review this intermediate output yourself: a model may follow the format while changing the substance. A good revision explains why a selected group is highlighted and identifies the exact lines changed. “Made it more engaging” does not explain whether the lesson survived.
Remotion’s coding-agent guide provides another project-based route for video work. Our downloadable reference uses Pillow and FFmpeg to keep this particular example inspectable; the semantic checks still apply if you later rebuild it with Remotion. Do not mix commands from the two stacks without also changing the project setup.
4. Render the reference locally
The full narration path needs Python 3.10 or later, Pillow, FFmpeg including ffprobe, and macOS’s say utility with an English voice. The checked reference uses Samantha. Install tools through your normal package manager, then confirm they are on PATH. No model key is needed. Rendering consumes local compute; access to Opus for a separate editing session follows your own account terms.
cd opus-explainer-20261008
python3 -m venv .venv
source .venv/bin/activate
python3 -m pip install -r requirements.txt
ffmpeg -version
ffprobe -version
say -v '?'
python3 render.py --voice Samantha
The script draws 1,440 frames at 24 fps in 1280×720. Each scene lasts ten seconds. It synthesizes each narration segment separately, rejects a segment longer than 9.7 seconds, pads shorter audio to the scene boundary, then joins six segments. FFmpeg combines H.264 video, AAC audio and a selectable English subtitle track. The same narration is visibly rendered into the frames, so the explanation remains available when a player hides selectable captions.
On Linux or Windows, run python3 render.py --silent for the visual reference. This produces output/silent.mp4, not a narrated equivalent. For full voice parity, provide six licensed recordings in the same ten-second structure and adapt the audio assembly step. Do not replace a missing narration tool with a silent audio track and mark the voiceover check as passed.
The expected main outputs are output/explainer.mp4, output/captions.srt, six PNG frames and output/narration-durations.json. Fonts are resolved from common macOS or Linux paths; set FONT_PATH to a TrueType font if neither exists. Font substitutions can alter wrapping, so inspect frames again after changing one.
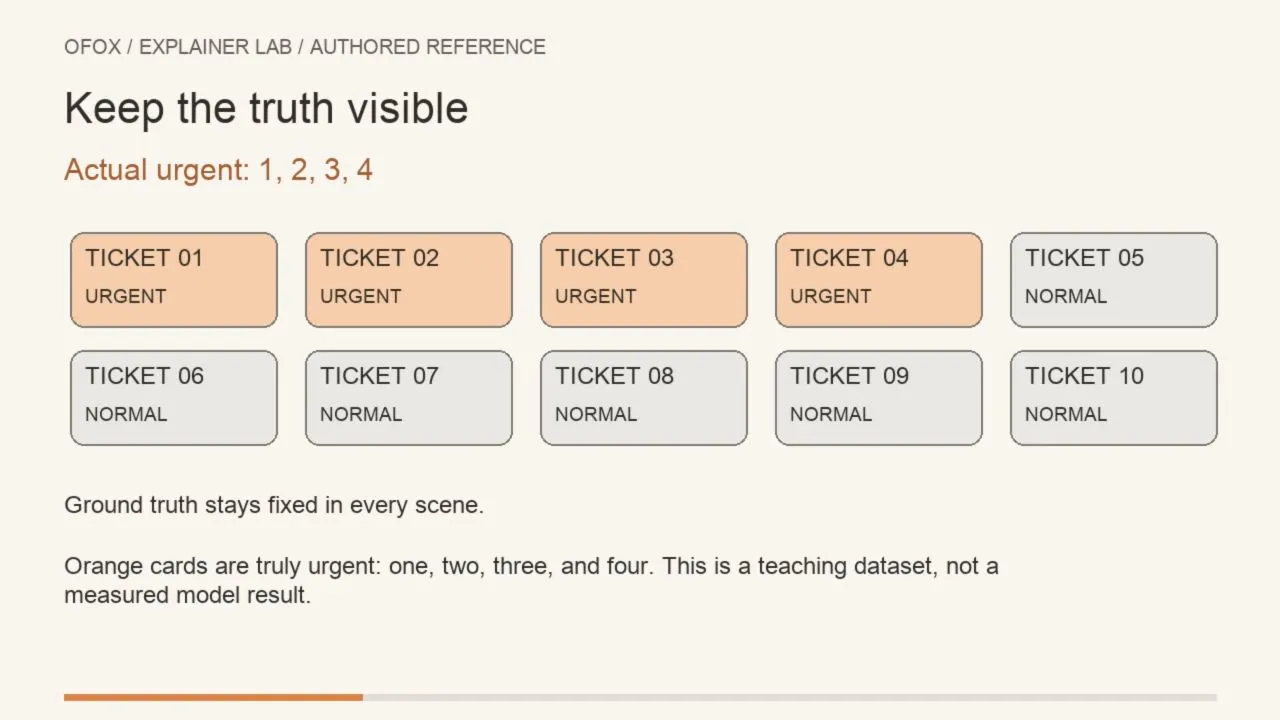
The preview shows our locally rendered English reference, not a captured Opus generation session. Download the MP4 to inspect the complete narration, transitions and ending.
5. Verify the explanation and the file separately
First recount the fixture independently. The intersection of the actual urgent and flagged sets is {1,2,3}. False alarms are {5,6}, the missed item is {4}, and correct negatives are {7,8,9,10}. Check these IDs against the video at 25, 35 and 45 seconds. The percentages alone are insufficient: a frame could show 60% while highlighting the wrong cards.
Next inspect the exported media rather than only the timeline configuration:
python3 test_project.py
ffprobe -v error -show_entries \
  format=duration:stream=codec_type,codec_name,width,height,r_frame_rate \
  -of json output/explainer.mp4
ffmpeg -v error -i output/explainer.mp4 -f null -
Expect a 60-second container, H.264 video at 1280×720 and 24 fps, AAC narration, and a subtitle stream. Successful decoding shows that FFmpeg can read the file; it does not prove the voice sounds natural or the explanation is understandable. Listen once without watching, then watch once with sound disabled. The lesson should work in both conditions.
Read the subtitle file and compare it with each ten-second scene. In this deliberately short project, a cue spans the full scene. A later conversational voiceover may need sentence-level timing rather than one long cue. Our voiceover and subtitle synchronization tutorial covers that separate editing task. Do not shorten a cue while leaving its spoken sentence crossing into the next scene.
Finally, test a small-screen view. Dense paragraph subtitles or tiny ticket labels may require a new layout. Scaling a horizontal frame into a vertical canvas is not a readability fix; use the landscape-to-vertical workflow when producing a separate mobile version.
6. Make the next revision measurable
Treat the first render as a baseline, then change one teaching decision at a time. For example, ask a colleague to identify the recall denominator while the video is paused at 45 seconds. Record their answer before explaining it. If they count five outlines from the preceding precision scene, add a clearer transition or a brief spoken reminder that the selected set has changed. This is a proposed comprehension check, not a user study we conducted for the article.
An editable project matters because the correction may involve more than a caption. If you replace support tickets with document retrieval results, update the object names, ground truth, narration, source ledger and test expectations together. Do not reuse the 60% and 75% labels unless the replacement fixture produces those numbers. Keep real customer data out of the project unless you have permission to use and publish it.
Define the delivery boundary explicitly: this version is an English horizontal reference, not a localized voice pack, vertical advertisement or benchmark against another model. Those are separate outputs with separate reviews. The reusable part is the procedure for keeping evidence and explanation aligned. Opus can be assigned the revision work, but the person publishing the video remains responsible for accepting the resulting claims and checking the actual artifact.
7. Repair failures without rewriting the lesson
| Symptom | Likely cause | Targeted repair |
|---|---|---|
| Narration spills into the next scene | Longer wording or slower selected voice | Shorten that segment and rerun its duration check |
| Correct percentage, wrong outline | Animation state differs from the fixture | Restore the selected IDs before changing motion |
| Squares appear instead of letters | Missing or unsupported font | Set FONT_PATH and inspect regenerated frames |
| No sound in the downloaded file | Silent mode, failed synthesis or wrong stream mapping | Inspect streams; rerun full narration path |
| Frame is attractive but confusing | More than one visual meaning per color | Restore fixed ground-truth colors and explicit labels |
| Render command fails after a model edit | Syntax, tool or dependency change | Keep the error log and compare the smallest diff |
A useful correction prompt is precise: “At 45 seconds, recall must select IDs 1–4. Restore that set without changing narration, duration or the dataset. Render again and show the revised 45-second frame.” This makes the proposed repair reviewable. A vague request to improve the whole video may alter already verified scenes.
Keep the original project and MP4 before each accepted revision. Record the source version, changed claims, render command and output hashes. For a new subject, replace the fixture and claim ledger first, then rewrite the narration and visuals together. A successful local render is the beginning of verification; publication is justified when the source, spoken explanation, visible objects and exported file all agree.
Frequently Asked Questions
- Was the reference video generated by Opus 5.5?
- No. It is an authored reference rendered locally with Python, Pillow, macOS speech synthesis and FFmpeg. The Opus prompts are editable task briefs, not measured model results.
- Can I reproduce the video without a model API key?
- Yes. The reference project makes no model calls. Full narration reproduction uses macOS say; other systems can render a silent version and add their own licensed narration.
- Does a playable MP4 prove that an educational explanation is correct?
- No. Check the source definitions, item identities, counts and the relationship between narration and animation separately from codec and duration checks.